Why you will love this recipe
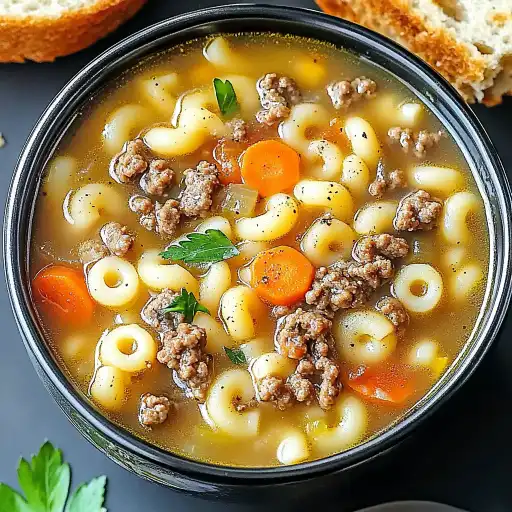
This Cheeseburger Macaroni Soup is an instant family favorite because it captures the essence of two beloved dishes in a convenient and comforting format. What’s not to love about a warm bowl that tastes just like a cheeseburger, but in soup form? It’s incredibly versatile, allowing you to adjust ingredients to your liking – more cheese, extra spices, or different types of meat. It’s also a time-saver; everything cooks in one pot, minimizing cleanup. Plus, it’s a fantastic way to sneak in some extra vegetables like diced carrots or celery to boost the nutritional value without sacrificing the flavor. The ease of preparation and the delicious taste make this soup a go-to recipe for busy weeknights.
Ingredients:
1 lb ground beef (about 450g) 1 medium yellow onion, chopped 2 garlic cloves, minced 3 cups beef broth (720ml) 1 can diced tomatoes (14.5 oz / 411g), undrained 1 tablespoon Worcestershire sauce 1 teaspoon yellow mustard 1 teaspoon smoked paprika 1 cup elbow macaroni (uncooked) 1 cup heavy cream (240ml) 2 cups shredded cheddar cheese (about 225g) Salt and black pepper, to taste 1 tablespoon olive oil (optional, for sautéing)
Preparation:
Step 1: Brown the Beef In a large soup pot or Dutch oven, place the ground beef. Cook over medium-high heat, breaking it apart with a spoon, until it is browned. Ensure that the beef is cooked evenly, with no pink remaining. This typically takes about 5-7 minutes. Draining excess fat is crucial to prevent the soup from becoming greasy, which can affect the overall taste and texture. Removing the excess fat also makes the soup healthier. If you’re using lean ground beef, this step might produce less fat, but it’s always good to check.
Step 2: Add Aromatics Once the beef is browned and drained, add the chopped yellow onion and minced garlic to the pot. Sauté these aromatics for about 3–4 minutes, until the onions become translucent and fragrant. Stir frequently to prevent the garlic from burning, which can impart a bitter taste. The aroma of sautéing onions and garlic is a signal that the foundation of the soup is being built. This step is essential because it infuses the soup with a deep, savory flavor that enhances the overall profile.
Step 3: Build the Base Pour in the beef broth, ensuring it covers the beef and aromatics. Add the can of diced tomatoes (undrained), Worcestershire sauce, yellow mustard, smoked paprika, salt, and pepper. Stir well to combine all the ingredients. The Worcestershire sauce adds a depth of umami, while the yellow mustard provides a subtle tanginess that complements the richness of the beef. Smoked paprika introduces a smoky flavor that elevates the cheeseburger taste. Season with salt and pepper to your preference, keeping in mind that the cheese will also add saltiness later.
Step 4: Cook the Pasta Bring the mixture to a gentle boil over medium heat. Once boiling, add the uncooked elbow macaroni to the pot. Stir well to ensure the macaroni is submerged in the liquid. Reduce the heat to medium-low and simmer for 10–12 minutes, stirring occasionally to prevent the pasta from sticking to the bottom of the pot. Cook until the macaroni is tender but still slightly firm to the bite (al dente). Overcooking the macaroni can result in a mushy soup, so keep a close watch.
Step 5: Add Cream and Cheese Lower the heat to the lowest setting. Pour in the heavy cream, stirring gently to incorporate it into the soup. Gradually add the shredded cheddar cheese, stirring continuously until the cheese is fully melted and the soup is smooth and creamy. Be patient and ensure the cheese melts evenly to avoid clumps. The heavy cream adds richness and a velvety texture, while the cheddar cheese provides that classic cheeseburger flavor. If you prefer a sharper taste, you can use a blend of cheddar and Monterey Jack cheese.
Step 6: Adjust and Serve Taste the soup and adjust the seasoning as needed. Add more salt and pepper to your preference. If you want a bit of heat, consider adding a pinch of red pepper flakes or a dash of hot sauce. Serve the soup hot, garnished with extra shredded cheese or chopped fresh parsley for a pop of color and freshness. Optional toppings include crispy bacon bits, diced tomatoes, a dollop of sour cream, or a sprinkle of green onions.
COOKING Rating: 4.5/5 Stars
Serving Suggestions:
This Cheeseburger Macaroni Soup is hearty enough to be a meal on its own, but it also pairs well with several sides. Consider serving it with a side of crusty bread or garlic toast for dipping. A simple green salad with a vinaigrette dressing can provide a refreshing contrast to the richness of the soup. Alternatively, you could serve it with a side of steamed vegetables like broccoli or green beans for a more balanced meal. For a fun twist, offer mini slider buns on the side to complete the cheeseburger theme.
Tips:
For a richer flavor, use a combination of ground beef and ground pork. To make the soup spicier, add a pinch of red pepper flakes or a dash of your favorite hot sauce. If you don’t have heavy cream, you can use half-and-half or whole milk, but the soup won’t be as creamy. To prevent the cheese from clumping, shred it yourself instead of using pre-shredded cheese, which contains cellulose. For a vegetarian version, substitute the ground beef with plant-based ground meat.
Prep Time: 15 minutes
Cook Time: 30 minutes
Total Time: 45 minutes
Nutritional Information: (Per serving, approximate) Calories: 450 Protein: 30g Sodium: 800mg
Conclusion
Cheeseburger Macaroni Soup is a delightful and easy-to-make recipe that brings together the best of two classic dishes. It’s a perfect meal for busy weeknights, offering a comforting and satisfying experience with minimal effort. The versatility of the recipe allows you to customize it to your liking, making it a surefire hit with family and friends. Whether you’re looking for a quick dinner solution or a fun twist on traditional comfort food, this soup is a must-try. So, gather your ingredients, follow the simple steps, and enjoy a warm bowl of cheeseburger goodness!
5 Questions and Answers About This Recipe
Question 1: Can I make this soup ahead of time? Answer: Yes, Cheeseburger Macaroni Soup can be made ahead of time. In fact, the flavors often meld together even better when the soup sits for a day or two in the refrigerator. Store it in an airtight container and reheat it gently on the stovetop or in the microwave. You might need to add a splash of broth or water when reheating, as the pasta tends to absorb some of the liquid.
Question 2: Can I freeze this soup? Answer: While you can freeze this soup, be aware that the texture of the pasta and cheese may change slightly upon thawing. The pasta might become a bit softer, and the cheese could separate a bit. To minimize these effects, cook the pasta slightly less than al dente before freezing. Let the soup cool completely before transferring it to freezer-safe containers or bags. When thawing, do it slowly in the refrigerator and reheat gently.
Question 3: What other types of cheese can I use? Answer: While cheddar cheese is the classic choice for cheeseburger flavor, you can certainly experiment with other cheeses. Monterey Jack, Colby Jack, or a blend of cheddar and Gruyere can add different dimensions of flavor. For a spicier kick, consider using pepper jack cheese. Just make sure the cheese melts well and complements the other flavors in the soup.
Question 4: Can I add vegetables to this soup? Answer: Absolutely! Adding vegetables can enhance the nutritional value and flavor of the soup. Diced carrots, celery, bell peppers, and zucchini are great additions. You can sauté them along with the onions and garlic at the beginning of the recipe. Other options include adding frozen peas or corn during the last few minutes of cooking.
Question 5: Is there a way to make this soup healthier? Answer: Yes, there are several ways to make this soup healthier. Use lean or extra-lean ground beef to reduce the fat content. Substitute whole wheat macaroni for regular elbow macaroni to increase the fiber. Use reduced-fat cheddar cheese and opt for half-and-half instead of heavy cream. Increase the amount of vegetables to add more nutrients and bulk up the soup without adding extra calories. You can also reduce the amount of salt used and rely on herbs and spices for flavor.